Disclosure: This post may contain affiliate links, meaning we get a commission if you decide to make a purchase through our links, at no cost to you. Please read our disclosure for more info.
A beautiful baby can turn anyone into a crafter. There’s something heartwarming about making a gift from the heart for the new love in your life.
We believe everyone should be able to experience that joy, not just the expert artisans. That’s why the internet is so great: it’s a place where you can learn to do anything if you know where to look.
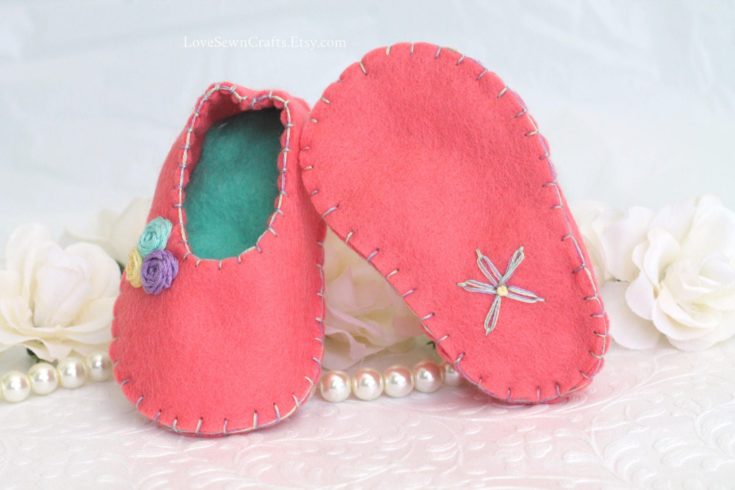
Handmade baby booties shown above are available from Etsy.
A pair of embroidered booties is a project that’s easier than you may think. Here’s how to make a set that’s customized to your infant’s size and style.
How to Make Embroidered Booties for Babies
Depending on your crafting skills, baby booties are quick projects for crocheters, knitters, and more. The easiest option, though, maybe these unique embroidered felt booties. Here’s how to make a pair that’s perfect for your baby’s pack and play time.
Step 1: Plan Your Embroidery Design
First things first: you need to decide what you want to embroider on the booties. Maybe it’s a simple flower. Even something that seems ambitious like a tractor is possible if you take it piece by piece.
Draw out the design on a paper. Choose the colors you want for each section. Be sure to decide where you want it to be on the booties and how big you want it to be.
Step 2: Shop for Supplies
Now that you have a plan, it’s time to hit the craft store.
First, you need fabric for the booties. Fabrics with tight weaves tend to work best when you’re embroidering because they’ll hold the design stable. We’re using wool felt in this example, but you can swap out a different fabric if you prefer.
You can choose to use the same color of felt for the whole bootie. If you prefer, use one color for the upper part and a different color for the sole.
Next, pick out your embroidery thread based on the colors you chose for your design. Make sure you hold up your felt next to the embroidery thread to make sure the colors go together.
The other supplies you’ll need include:
- Fabric pencil
- A thread that’s the same color as your felt
- A button, snap, or ribbon depending on how you want the bootie strap to close
- Needle
- Utility knife (optional but it will make the process easier if you have one)
- Small embroidery hoop (this will make the embroidery easier, especially if you’re a beginner, but it’s not a must)
The benefit of making crafts for babies is that they’re tiny. You won’t need much fabric, so this is a budget-friendly project. It also means you won’t need to clutter your home with tons of materials.
Step 3: Measure Twice, Cut Once
Now it’s time to prepare your felt. Measure the length of the baby’s feet. Martha Stewart has a handy baby bootie pattern you can use for your felt. Print the pattern but enlarge it until each piece is 1/4 of an inch longer than your baby’s feet.
Cut out the shapes in the pattern, lay them on the felt, and cut around them. For an easier process, secure the felt to the paper with tape or pins.
You’ll notice that the pattern has some additional lines inside the upper part of the bootie. You need to cut along these lines too.
If you have a utility knife, you can leave the pattern on top of the felt and cut on the lines, deep enough to cut the felt. If you don’t have one, cut the pattern with regular scissors. Use a fabric pencil to trace those cuts through the pattern and then cut on those lines on the felt.
Step 4: Add Your Custom Embroidery
It will be easier to embroider your fabric before you assemble the booties, so now is the time. If you’re new to embroidery, read up on the basics.
Start by drawing the outline of your design with a fabric pencil. You can even cut out the design on the paper you used to draw out your design, then use this as a pattern.
From there, pull out your first color of embroidery thread and your needle and get to work.
Step 5: Seam the Upper Part of the Booties
When you’ve embroidered your design, it’s time to assemble the booties.
Take the piece of fabric for the upper part of the booties and fold it in half length-wise. In other words, the curved edges should line up with each other.
Using the felt-colored thread and a needle, stitch along the flat edge of this folded piece. This seam will be at the back of the bootie.
Step 6: Attach the Upper Part and the Sole
Your next step is to attach the sole to the upper part of the bootie. Take the edge you just seamed and place it on top of the narrow end of the sole. Stitch around the outer border of the sole, attaching it to the upper part as you go along.
At this point, you’ll have a flat sole attached to a rounded top portion. You’ll also have two pieces at the top of the bootie that is only attached to one end. These will become the strap at the top of the booties.
If you want visible stitching, you can complete this step with the upper part facing right-side-out. If not, place the upper portion upside-down so that your embroidered design is on the inside.
When you’re done stitching, turn the bootie inside out so you can see your embroidery. This hides your stitching.
Step 7: Prepare the Straps
The last stage is to have some way for the two sides of the strap at the top of the booties to connect.
Depending on your style, you could cut a hole in one side of the strap and sew a button onto the other side. Snaps are also popular options.
If you prefer to stay away from swallowable pieces, a ribbon could be a great choice. Cut a hole in each side of the strap, thread a ribbon through the two holes, and tie a bow in the front.
Showing Your Love with Crafts
Crafting is more than a relaxing hobby. It’s a way for you to show loved ones that you appreciate them, and that includes the new infant in your life.
Using the steps above, you can make a simple but one-of-a-kind pair of embroidered booties your family will treasure for years to come.
For more great ways to bond with your baby, craft ideas, and more, check out other articles on our blog or read our story.